Achieving a cinematic look with just one light source can seem daunting. However, industry expert Roger Deakins, a celebrated cinematographer, emphasizes, "The light defines the mood and character of the scene." This quote reflects the essence of creating a visually compelling image using minimal equipment.
In the realm of filmmaking and photography, lighting is everything. Understanding how to manipulate a single light can transform a basic scene into something striking. Mastering techniques like shadows and highlights can enhance the narrative without the need for complex setups. Experimenting with angles and distances can yield surprising results.
However, relying solely on one light source presents challenges. You may encounter flat images or awkward shadows if not careful. It demands thoughtful consideration of the subject and surroundings. By focusing on these elements, you can develop a unique style that speaks volumes about your artistic vision. Exploring how to achieve a cinematic look with a single light source is both an art and a trial-and-error process, inviting reflection on what works best for your projects.
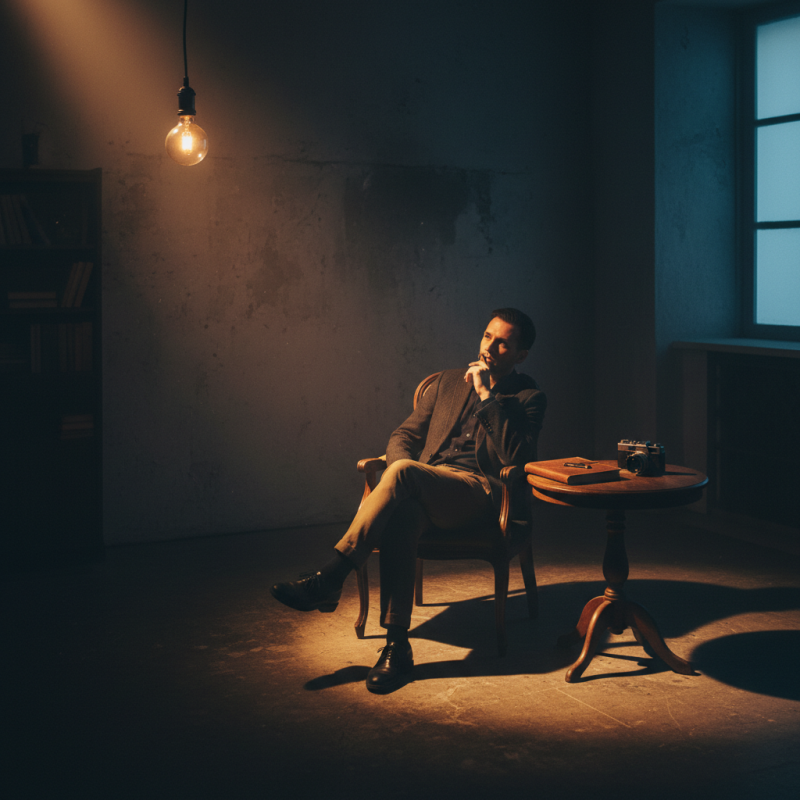
Understanding the basics of cinematic lighting with one source is crucial for any filmmaker. Using a single light source creates depth and mood. The positioning of this light can drastically change the scene's feel. For instance, placing the light at a 45-degree angle can produce dramatic shadows.
Experimenting with angles helps in understanding how light interacts with your subjects.
Shadows play a pivotal role in establishing a cinematic atmosphere. Soft shadows can create a gentle, inviting look, while harsh shadows add tension. Using modifiers like diffusion can soften your light, but keep in mind that too much diffusion may wash out your scene. Balancing the intensity of light is also vital. A light that's too strong can create unflattering highlights, while a weak light might not convey the desired emotion.
Reflectors and flags can enhance your lighting setup. They can bounce light or block it, adding more control. However, the illusion of perfection can sometimes hinder creativity. Embracing imperfections may lead to unexpected, unique results. Lighting is an art, and mastering it requires practice and patience. Each experiment teaches valuable lessons about exposure and composition.
Choosing the right type of light for a cinematic look is essential for achieving that polished, professional feel in your projects. Soft light is often a go-to choice. It creates gentle shadows and wraps around subjects beautifully. A softbox can diffuse harsh light, making it ideal for portraits. However, soft light may wash out details, which is sometimes unappealing.
On the other hand, hard light adds dramatic flair. It produces bold shadows, enhancing textures and depth. Using a bare bulb can achieve this effect easily. However, it requires careful placement. Shadows can be unforgiving and may distract from the main subject. Experimenting with angles and distances is crucial when working with hard light.
Remember, the atmosphere you want to create significantly influences your choice. Each type of light has strengths and weaknesses. Balancing them transforms your scene. Don’t hesitate to adjust as needed. The journey to achieve the right look involves trial and error. Embrace imperfections; they often lead to unexpected brilliance.
| Tip Number | Tip Description | Recommended Light Type | Ideal Setup |
|---|---|---|---|
| 1 | Use Soft Light for Portraits | Softbox | Position at 45 degrees |
| 2 | Add Depth with Backlighting | LED Panel | Behind the subject |
| 3 | Experiment with Color Gels | Tungsten Light | Color gels for various moods |
| 4 | Control Shadows with Flags | Fresnel Light | Use flags to shape light |
| 5 | Use Rim Lighting for Depth | Hard Light | Position to one side |
| 6 | Create Mood with Contrast | Cinematic LED | Use low and high intensity |
| 7 | Use Practical Lights as Accent | Table Lamp | In the shot as a source |
| 8 | Experiment with Angles | Spotlight | Change positions to see effects |
| 9 | Use Light Modifiers for Control | Diffuser | Over the light source |
| 10 | Balance Ambient and Key Light | Mixing Light Sources | Find the right mix |
When mastering angles for your light source, positioning is crucial. The right angle can transform an ordinary scene into something extraordinary. Start by experimenting with the light’s height. Low angles can create long shadows, adding depth. High angles may flatten your subject but create a soft, diffused look. Adjusting the angle slightly can yield different moods and impressions.
Consider the direction of the light. Front lighting illuminates details but can wash out textures. Side lighting highlights contours and shapes, providing dimension. Backlighting creates a silhouette effect, often evoking drama and mystery. Don’t be afraid to move your light source around. Small changes can lead to surprising outcomes.
As you position your light, observe how it interacts with your subject. Shadows may fall in unexpected ways. This is an opportunity for creativity. Embrace these imperfections. They can lead to more authentic and striking visuals. Remember, experimentation is key. The more you practice, the more you’ll learn about how angles influence your lighting and overall cinematic look.
Creating depth in your images can enhance the cinematic look with just one light source.
Shadows and highlights play a crucial role in adding dimension to your scenes. Use side lighting to cast interesting shadows.
This can dramatically impact the mood of your photograph. Variations in shadow depth can evoke different feelings.
Experiment with angles to discover how they affect the final image.
When positioning your light, consider the subject's features. A slightly overhead light can create captivating highlights.
This technique helps accentuate textures, bringing the subject to life. Using reflectors can soften harsh shadows.
They can also add subtle highlights, enhancing your cinematic approach. However, be mindful.
Overusing reflectors may lead to a flat look, lacking the intrigue you desire.
Balance is essential. If an image feels too shadowy, it might distract rather than engage. When light and darkness coexist harmoniously,
images become compelling. Avoid forcing dramatic shadows if they do not add value. Think about each decision.
The goal is not to follow trends but to find your artistic voice through light and shadow.
Lighting plays a crucial role in video production, especially when using just one light source. The right color can significantly enhance the mood and atmosphere of your scenes. According to a study by the American Society of Cinematographers, color affects audience emotions and perception immediately. Warm tones can evoke feelings of comfort, while cooler tones induce a sense of calm or melancholy. Choosing the right color temperature for your light can drastically change the scene's emotional weight.
Filters provide another layer of complexity. They can soften shadows, reduce glare, or add distinct color casts to your shots. A report from the Visual Effects Society highlights that using a color filter can increase the perceived depth in an image. However, overusing filters may lead to unnatural results. It’s a delicate balance between enhancing the visual and maintaining authenticity. Experimenting is key, but it’s essential to reflect on the impact of these choices. Sometimes less is more, and a direct light without additional manipulation can produce a raw, genuine feel. Remember that each decision shapes the narrative you want to convey.
This chart illustrates the effectiveness of different techniques for enhancing mood and atmosphere when using a single light source. Each technique is rated on a scale from 1 to 10 based on its impact.
: Soft light creates gentle shadows. It wraps around subjects beautifully, adding a polished feel.
Hard light adds dramatic flair. It enhances textures and depth with bold shadows.
Soft light may wash out details. This can be unappealing in certain situations.
The right color enhances mood and atmosphere. Warm tones provide comfort; cooler tones imply calmness.
Filters can soften shadows or add color casts. They help create depth in an image.
Overusing filters can lead to unnatural results. Maintain a delicate balance to enhance authenticity.
Angle and distance are crucial. Proper placement prevents distracting shadows from overshadowing the subject.
Warm tones evoke comfort, while cool tones can induce sadness or calmness.
Experimentation is key to finding the right look. Trial and error often leads to unexpected results.
Embracing imperfections can lead to unique brilliance. Reflecting on mistakes enhances future decisions.
Achieving a cinematic look with a single light source requires a solid understanding of lighting fundamentals. Start by choosing the right type of light that complements your scene, ensuring it aligns with the mood you want to convey. Mastering the positioning of your light source is crucial; experimenting with angles can create dynamic shadows and highlights that add depth to your composition.
To further enhance your cinematographic style, play with shadows to define your subjects and incorporate colored filters to evoke specific emotions. By focusing on these elements, you will learn how to achieve a cinematic look with a single light source, transforming your visuals into captivating narratives that resonate with viewers.
Gravity Light