How to Install Low Voltage Landscape Lighting Easily Yourself?

Time:2026-05-13 Author:Amelia
0%

Installing low voltage landscape lighting can enhance your home's beauty and security. Reports indicate that outdoor lighting can boost property values by up to 20%. Many homeowners consider this a worthwhile investment. Yet, a significant number worry about costs and installation challenges.

Experts suggest that it’s possible to achieve a professional look without hiring someone. Jason Smith, a landscaping specialist, states, "Learning how to install low voltage landscape lighting without a professional can save you money and empower you." With the right tools and resources, achieving stunning outdoor illumination is accessible to many homeowners.

However, it’s essential to recognize that the process may present challenges. Navigating through wiring and placement can feel overwhelming. Despite these hurdles, the learning experience can be rewarding. The satisfaction of completing a project yourself fosters a deeper connection to your home. By understanding the essentials, anyone can create their dream outdoor space.

How to Install Low Voltage Landscape Lighting Easily Yourself?

Understanding Low Voltage Landscape Lighting Components

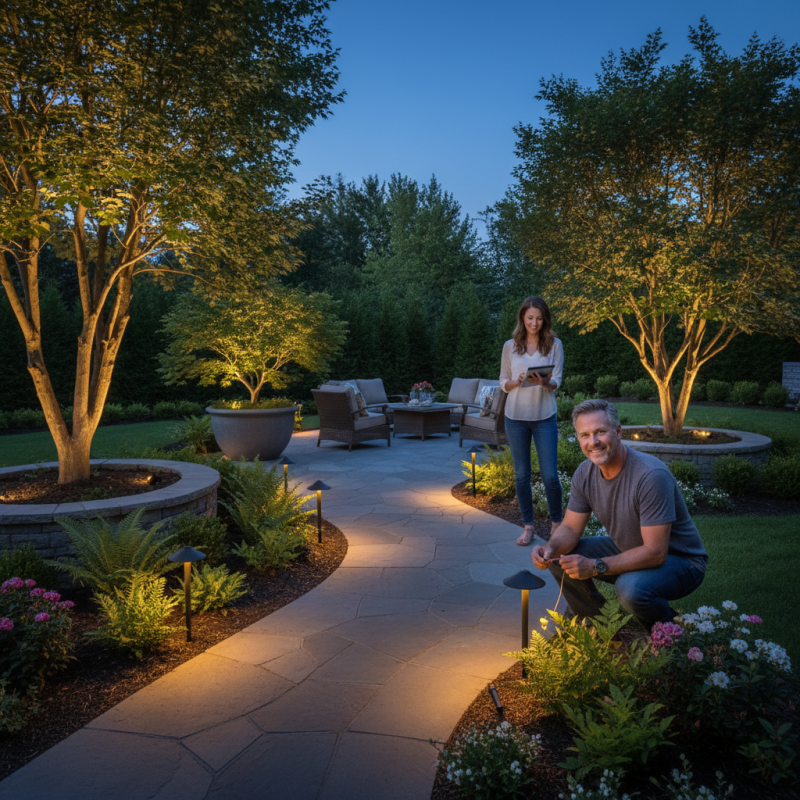
When embarking on a low voltage landscape lighting project, understanding its components is crucial. Typically, these systems comprise transformers, fixtures, wires, and connectors. The transformer converts standard voltage to low voltage, ensuring safety and efficiency. According to a 2022 study by the Lighting Research Center, nearly 70% of homeowners prefer low voltage systems for their energy efficiency and safety.

Fixtures come in various designs, from path lights to spotlights. Each serves a specific purpose, enhancing aesthetics and visibility. It's important to select fixtures that complement your landscape. Additionally, using high-quality wire reduces energy loss and improves lifespan. A recent survey conducted by the American Society of Landscape Architects revealed that over 60% of lighting failures stem from poor wiring choices.

Connectors play a vital role in maintaining the integrity of the system. Utilizing waterproof connectors can prevent failures due to moisture. Some DIY enthusiasts overlook this detail. This can lead to frustrations down the line. Installing low voltage lighting requires attention to each component and its installation. The details matter, and even small oversights can lead to larger issues later.

Planning Your Landscape Lighting Layout Efficiently

When considering low voltage landscape lighting, careful planning is essential. First, map out your space. Identify key areas that need illumination, such as pathways and gardens. The Illuminating Engineering Society emphasizes that well-lit landscapes enhance safety and improve aesthetics. Proper lighting can increase property value, making it a smart investment.

Next, consider the layout. According to a report from the National Association of Home Builders, homeowners are increasingly opting for DIY landscape lighting projects. A common mistake is uneven light placement, which can create dark spots in your yard. Aim for balance: use layered lighting techniques. This creates depth and reduces harsh shadows.

Think about your light sources. LED options are energy-efficient and have longer lifespans, making them a popular choice. However, some homeowners overlook the impact of color temperature. Soft white lights often yield a cozy atmosphere, while brighter lights may appear stark. Testing a few different bulbs can help you see what works best for your landscape. Adjusting your plan based on trial and error will yield the best results.

Gathering Necessary Tools and Equipment for Installation

Installing low-voltage landscape lighting can transform your outdoor space. To ensure a smooth installation process, gathering the necessary tools and equipment is crucial. Begin with a shovel for digging trenches, ensuring power lines are safely buried. A voltage tester will help check existing wiring before installation. Having wire connectors and electrical tape on hand is also essential to secure connections effectively.

Tips: Check your local codes to avoid complications during installation. Understand that some equipment might not be compatible, so read user manuals beforehand. A good pair of gloves can protect your hands while working.

Lighting fixtures should complement your landscape. Select a variety of styles for interest. Be aware that incorrect placement can lead to inadequate lighting. Misjudging distances can create uneven light distribution. Take time to plan your layout; this minimizes mistakes and enhances your project’s overall look.

Step-by-Step Installation Process for Low Voltage Lighting

Installing low voltage landscape lighting can transform your outdoor space. Here’s a straightforward installation process to guide you.

Choose the layout before digging in. Map out where each light will go. Think about the spaces you want to illuminate. Pathways, trees, and gardens often benefit from lighting.

Before you start, gather your tools. You’ll need a shovel, wire connectors, and stakes. Use a voltage tester to ensure safety. This step keeps you safe from electric shock.

When laying down the wiring, avoid sharp bends. This helps prevent damage. Secure the cables with stakes to keep them in place. Remember to leave some slack in the wire for adjustments. If things don’t look right, don’t hesitate to re-adjust the lights.

Resetting the placement could make a big difference. Always check the light direction too. Sometimes a slight angle can greatly enhance brightness.

Overall, take your time. Mistakes are part of the process. Each slight adjustment brings you closer to the ideal lighting. Enjoy the journey of improving your landscape with low voltage lighting!

How to Install Low Voltage Landscape Lighting Easily Yourself? - Step-by-Step Installation Process for Low Voltage Lighting

Step Description Tools Needed Estimated Time
1 Plan your lighting layout. Paper, pencil 1 hour
2 Purchase necessary materials. Shopping list 2 hours
3 Mark the locations of fixtures. Marker, measuring tape 30 minutes
4 Install the lighting fixtures. Screwdriver, stakes 2 hours
5 Connect the wiring. Wire connectors, wire stripper 1 hour
6 Test the lights. None 30 minutes
7 Adjust and finalize your setup. None 1 hour

Testing and Maintaining Your Landscape Lighting System

Maintaining your landscape lighting system is essential for optimal performance. Proper testing ensures that fixtures are functioning correctly. Regular checks can prevent unexpected failures. Research shows that about 30% of landscape lighting systems fail due to poor maintenance. Simple troubleshooting can save time and money.

Start by inspecting all fixtures for physical damage. Look for signs of corrosion or wear. Ensure bulbs are replaced when burnt out. It’s crucial to use bulbs that match the original specifications to avoid further issues. Testing the connections is also vital. Corroded or loose connections can result in intermittent lighting. Re-establish good connections to maintain a reliable system.

Consider the seasonal effects on your system. Weather can impact performance. Heavy rain and snow may weaken wires. Some homeowners neglect to check their systems regularly, leading to costly repairs later. It's beneficial to create a maintenance schedule. This ensures all components receive attention throughout the year. Regular maintenance can extend the system's lifespan significantly. In fact, consistent care can enhance aesthetics while lowering energy costs.

Low Voltage Landscape Lighting Installation Guide

This chart illustrates the estimated time required for each step in installing low voltage landscape lighting. Proper preparation is crucial to ensure a smooth installation process. The majority of time is spent on the actual installation, followed by testing the system and regular maintenance. Energy efficiency is a consideration in planning your landscape lighting system.

FAQS

: How should I start planning my landscape lighting?

: Begin by mapping your space. Identify areas that need illumination, like pathways and gardens.

What common mistakes do homeowners make in landscape lighting?

Uneven light placement is a frequent error. It causes dark spots and disrupts balance.

Why is it important to use layered lighting techniques?

Layered lighting creates depth. It also reduces harsh shadows, making your landscape more inviting.

What light sources are recommended for landscape lighting?

LED lights are energy-efficient. They last longer and offer various color temperatures.

How can the color temperature of lights affect my landscape?

Soft white lights create a cozy atmosphere, while brighter lights can feel stark or harsh.

What tools do I need for installing low voltage lighting?

You’ll need a shovel, wire connectors, stakes, and a voltage tester for safety.

How can I ensure the wiring is correctly placed?

Avoid sharp bends in the wiring. Secure it with stakes and leave slack for adjustments.

How often should I test my landscape lighting system?

Regular checks are important. Aim for at least seasonally to catch any issues early.

What common issues should I look for during maintenance?

Inspect for physical damage, corrosion, and burnt-out bulbs. Check connections for reliability.

How can I extend the lifespan of my landscape lighting system?

Create a maintenance schedule. Regular care helps prevent unexpected failures and lowers costs.

Conclusion

Installing low voltage landscape lighting can be a rewarding DIY project, and it's easier than you might think if you know how to install low voltage landscape lighting without a professional. Start by understanding the various components, such as fixtures, transformers, and cables, which are essential for a successful setup. Next, carefully plan your layout to achieve the desired ambiance and functionality in your landscape.

Gather the necessary tools and equipment, like wire connectors, a shovel, and a screwdriver, to ensure a smooth installation process. Follow a step-by-step guide to set up your lights correctly, ensuring safety and efficiency. Finally, after installation, test the system to ensure all lights work correctly and establish a maintenance routine to keep your landscape lighting looking its best. With the right preparation and approach, you can enjoy a beautifully lit outdoor space.

Amelia

Amelia

Amelia is a seasoned marketing professional with a wealth of expertise in our company’s core offerings. With an unwavering passion for driving growth and innovation, she plays a pivotal role in shaping our marketing strategies and enhancing brand visibility. A key aspect of her responsibilities......