Harsh shadows in videos can be frustrating. Many creators struggle with this issue. You might often ask, "Why can't I get rid of harsh shadows in my videos?" Understanding this challenge is crucial for improving your work.
Shadows are affected by light sources and angles. If the light is too direct, it creates strong shadows. Reflectors and diffusers can help soften the light. Yet, many videographers still find it hard to control these elements. They often overlook how the environment impacts shadow formation.
Experimenting with natural light can provide insights. Shooting during different times of the day might yield better results. However, imperfect conditions can lead to unsatisfactory footage. Reflection and adaptation are key. Embracing your mistakes can lead to improvement. Each video is a chance to learn and grow.
Understanding the Causes of Harsh Shadows in Video Production
Harsh shadows often stem from direct overhead lighting. This situation creates strong contrasts that can distract viewers. Understanding this is crucial in improving video quality. Shadows can distort shapes and obscure details. Get familiar with how light interacts with objects, and you will begin to see the effects.
Placement of lights plays a key role. Positioning them at different angles can soften shadows. For instance, moving lights closer to the subject may yield better results. Using diffusers can also help. They scatter light, reducing harsh edges. Consider the time of day as well. Natural light shifts, creating varying shadows. Filming during golden hour can provide more flattering effects.
Experimenting is essential. Not every setup will meet your expectations. You might find that certain angles produce unexpected results. Don't hesitate to adjust your strategy. If a shadow doesn’t work, learn from it. Gaining experience takes time. Keep testing different techniques to find what truly works for your projects. This practice fosters a deeper understanding of lighting dynamics.
Techniques for Proper Lighting to Reduce Shadows
Effective lighting is crucial for reducing harsh shadows in your videos. Soft, diffused light sources can dramatically improve the quality of your footage. Using natural light is one option. Position your subject near a window on an overcast day. This creates a pleasant, evenly distributed light. If you need to shoot indoors, consider using softbox lights or ring lights. These tools mimic natural light, minimizing shadow intensity.
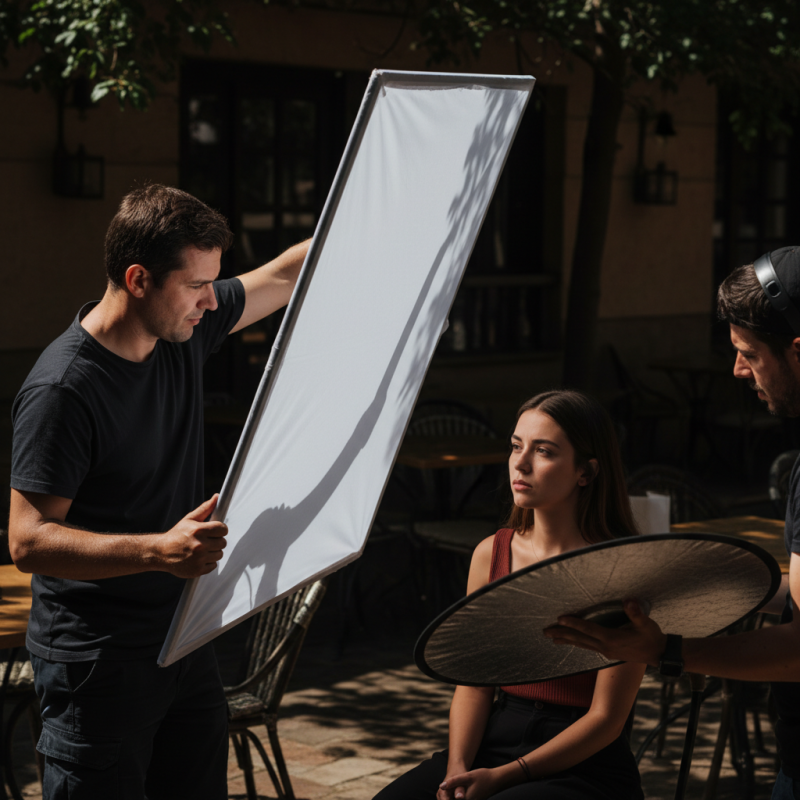
Another technique is the use of reflectors. Simple materials like white poster boards or foam core can bounce light back onto the subject. This fills in shadows and adds dimension. You might even notice uneven reflections if not positioned correctly. Experiment with angles to find the ideal setup. Additionally, the time of day plays a significant role in lighting quality. Golden hour, shortly after sunrise or before sunset, provides warm, flattering light.
Pay attention to light placement. Avoid placing lights too close or high above, which can create unflattering shadows. Assess your setup by reviewing footage and adjusting as needed. Sometimes, it’s beneficial to embrace certain shadows. They can add depth but strive for balance. Achieving the right lighting takes practice and experimentation. It's a learning process, and not every attempt will yield perfect results.
Lighting Techniques to Reduce Harsh Shadows in Videos
Utilizing Diffusers and Reflectors for Softer Light Effects
To eliminate harsh shadows in videos, utilizing diffusers and reflectors is essential. These tools soften light, creating a more flattering look. A study by the American Society of Cinematographers indicates that well-diffused light can increase viewer engagement by up to 30%. This improvement demonstrates the significant impact of light manipulation on visual storytelling.
Using diffusers allows you to break up harsh rays, resulting in softer shadows. Placing a diffuser close to your subject makes a substantial difference. It scatters light evenly, preventing unflattering contrasts on the face. A common mistake is using diffusers too far away, which can leave shadows harsh despite the tool's presence.
Reflectors can bounce light back onto your subject, enhancing the overall image quality. Gold or silver reflectors can create a warm or cool tone, depending on your desired mood. Placing a reflector at a 45-degree angle can help fill in shadows effectively. Remember, positioning matters. Experimenting with different placements will help you discover what works best. These techniques are not flawless. Overdoing diffusion can make your scene look flat or washed out. Balancing light sources is crucial for achieving the desired softness while maintaining depth.
How to Eliminate Harsh Shadows in Your Videos Effectively?
| Technique |
Description |
Effectiveness |
Notes |
| Using Diffusers |
Place diffusers in front of the light source to soften the light and reduce shadows. |
High |
Ideal for close-up shots. |
| Employing Reflectors |
Use reflectors to bounce light onto the subject, reducing shadows. |
Medium |
Best for outdoor lighting. |
| Adjusting Light Angle |
Change the position of the light source to a more flattering angle to minimize harsh shadows. |
High |
Requires flexibility in light setup. |
| Using Multiple Light Sources |
Setup multiple lights to fill in shadows from different angles. |
Very High |
Requires more equipment and setup time. |
Post-Production Methods to Correct Shadows in Editing Software
Harsh shadows can detract from the quality of your videos. Many creators overlook the impact of shadows in post-production. According to a study by the American Society of Cinematographers, 80% of footage can be improved with proper shadow correction. Editing software offers several techniques to mitigate these harsh effects.
One effective method is adjusting the shadow and highlight levels. Most editing software allows users to manipulate these settings easily. Reducing the contrast can lessen the harshness. However, be cautious not to overcorrect and lose details in brighter areas. Another technique involves using masks to isolate and adjust shadowed areas selectively. This can provide a more balanced look but requires precision and time.
Color grading is another crucial step in this process. Adding warmth to your shadows can soften their appearance. Research shows that videos with well-balanced colors retain viewer engagement 20% longer than those without. While these techniques are powerful, they can also lead to an unnatural look if not handled carefully. Balancing enhancements with realism is essential. Over-editing can lead to loss of authenticity, which diminishes storytelling.
Best Practices for Shooting to Minimize Harsh Shadows During Filming
When shooting videos, lighting plays a crucial role. Harsh shadows can ruin an otherwise excellent shot. One effective method to minimize shadows is to choose the right time of day. Early mornings and late afternoons provide soft, diffused light. This golden hour light creates a gentle glow and reduces harsh contrasts. You might also consider using reflected light, bouncing sunlight off a surface. This technique spreads light evenly, softening shadows and enhancing skin tones.
Experiment with different angles. Positioning your subjects away from direct sunlight also helps. This creates a more even light distribution. Additionally, using light modifiers like diffusers or softboxes can drastically reduce shadow intensity. These tools soften the light source, ensuring a more flattering result.
Don't forget to check your background. Sometimes, shadows appear because of surroundings rather than the light itself. A cluttered background can create distractions. Reassess your framing and surroundings to avoid unwanted shadows. Remember, capturing excellent video is part art and part science. Allow yourself the space to learn from your mistakes.
FAQS
: Diffusers soften light and eliminate harsh shadows. They create a more flattering look in videos.
Place the diffuser close to your subject. This helps scatter light evenly and prevents harsh contrasts.
Reflectors bounce light back onto subjects. They enhance image quality and can create warm or cool tones.
Position reflectors at a 45-degree angle. This effectively fills in shadows and improves overall lighting.
Early mornings and late afternoons offer soft, diffused light. This is often called golden hour.
A cluttered background can create distractions and shadows. Reassess framing to minimize unwanted shadows.
Using diffusers too far away can leave harsh shadows. Close placement is crucial for effective results.
Overdoing diffusion may make a scene look flat or washed out. Balance is key for depth and softness.
Video lighting is part art and part science. Mistakes are opportunities for learning and improvement.
Light modifiers like diffusers or softboxes can significantly soften light and reduce shadow intensity.
Conclusion
In video production, harsh shadows can often detract from the overall quality of your work, leading to the common question, "Why can't I get rid of harsh shadows in my videos?" Understanding the causes of these shadows is crucial, as they can stem from lighting angles, source intensity, or the environment. To combat this, employing proper lighting techniques is essential, such as adjusting the light source's position or using multiple light sources to create a balanced illumination.
Additionally, utilizing diffusers and reflectors can significantly soften the light, reducing sharp shadows. In post-production, editing software can also help correct shadow issues, making it possible to enhance your footage effectively. Following best practices during filming, such as selecting the right time of day and choosing suitable locations, can further minimize the likelihood of harsh shadows. By addressing these aspects, you can improve your video production and create visually appealing content.

 Gravity Light