How to achieve a cinematic look with a single light source begins with restraint, not expensive equipment. One carefully placed lamp can shape a face, separate a subject, and create emotional depth. The result depends on direction, distance, contrast, and the shadows you allow to remain.
Cinematographer Sven Nykvist famously said, “I try to use as little light as possible.” His approach offers a practical lesson for modern filmmakers. Place one soft key light roughly 45 degrees from the subject. Raise it slightly above eye level. Then move it closer for softer falloff, or farther away for a broader, weaker effect. A white wall can provide gentle bounce. A black flag can deepen the unlit side.
This guide explores how to achieve a cinematic look with a single light source in real shooting conditions. You will see how exposure, background distance, color temperature, and practical lights influence the frame. A dim room may create atmosphere. It may also hide important detail. That is where judgment matters.
Do not expect every shadow to look beautiful. Some will feel too heavy. That failure can teach you more than a perfect test. Watch the catchlight in the eye. Check the skin texture. Notice whether the background supports the story or competes with it. A cinematic image is not simply dark, warm, or dramatic. It feels intentional, even when the setup remains surprisingly simple.
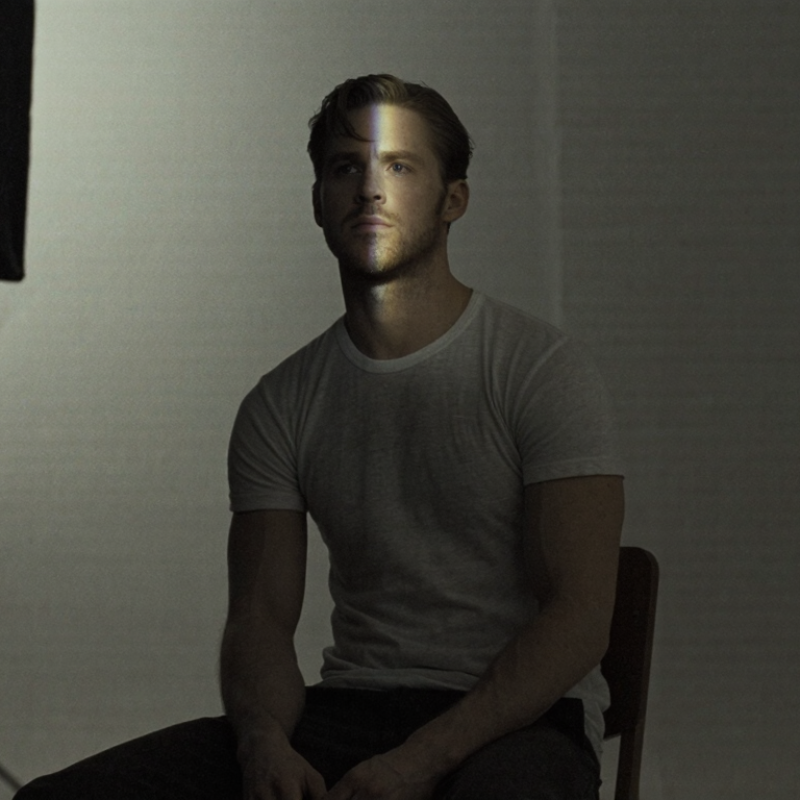
A cinematic look is not simply a dark image with dramatic contrast. It is a controlled relationship between light, shadow, color, space, and attention. In practice, I define it by what the viewer notices first. Skin should remain readable, while the background supports the subject without competing. Texture matters too. A curtain, wall, or wooden table can give the frame believable depth.
One light creates a clear visual decision. Place it about 45 degrees from the subject, slightly above eye level, and watch the cheek shadow. Move it closer for softer falloff and stronger subject separation. Move it farther away for more even exposure, though the image may lose intimacy. A white card can gently lift the dark side. A black surface can deepen it. Small changes matter.
During a small interview shoot, I often begin with the light near a window-like angle. I expose for the brightest skin area, then check the eyes and shadow detail. If the nose shadow becomes distracting, I raise or rotate the source instead of adding another light. This restraint keeps the frame coherent. Still, one light is not automatically cinematic. Hard shadows may feel severe, and backgrounds can become empty. I sometimes over-control the setup, then regret losing natural unevenness. A slightly imperfect shadow can feel more truthful than a flawless face.
How to Achieve a Cinematic Look With One Light
A cinematic image begins with a deliberate light source. A small, hard source creates sharp shadows and bright highlights. It can feel tense and theatrical. A larger source produces softer transitions across the face. I often place it slightly above eye level, about 45 degrees from the subject. This keeps the cheekbone defined without making the eyes look empty.
The modifier controls the light’s character. A diffuser softens skin and reduces distracting texture. A grid can narrow the beam and keep the background darker. Shooting direction matters just as much. Side lighting adds depth, while backlighting separates the subject from a dull wall. Watch the background carefully. A bright corner can steal attention. I sometimes move the subject only half a metre, and the entire mood changes. My first setup is rarely perfect.
Tips
Use a grey card to check exposure. Keep the brightest area near the face. Turn the subject slowly and observe the shadow under the nose. If the image looks too polished, reduce the fill instead of adding another light. Leave some darkness. It gives the frame room to breathe. A reflector can recover detail, but I often use too much at first. Start subtly.
A cinematic image often begins with light placement, not expensive equipment. I usually place one light about 45 degrees from the subject’s face. This creates a clear key side and a controlled shadow side. Rotate the subject slightly instead of moving the light immediately. Small changes can reveal the cheekbone, eye socket, or jawline. Watch the shadow. It tells you where the mood lives.
Height changes the emotional direction of the scene. Keep the light slightly above eye level for natural, sculpted shadows. Raise it too far, and the eyes may become dark and tired. Lower it near eye level for a flatter, more direct feeling. Distance controls contrast as well. Moving the light closer makes falloff stronger, so the face can stay bright while the background becomes darker. Moving it farther creates a more even exposure, but the image may lose depth.
I often begin with the light close, then move it back in small steps. I check the subject’s skin, the shadow edge, and the background separately. A white wall can bounce unwanted light into the dark side, even when the setup seems controlled. Covering that wall with dark fabric may restore contrast. I sometimes overdo the shadow during testing. That mistake is useful, because it shows how much detail the scene can survive. A subtle fill from nearby surroundings may be enough, but it should not erase the shape.
How to Achieve a Cinematic Look With One Light
Control Background Separation, Shadows, and Practical Lights
A cinematic image begins with controlled separation, not expensive equipment. Place your subject several feet from the background whenever possible. This creates darker negative space and prevents the light from flattening the scene. I usually position the key light slightly to one side, then adjust its height until the cheek retains shape without losing the eyes. Small changes matter.
Watch the shadows carefully. A hard source can create dramatic edges, but it may reveal distracting textures. Move the light closer for faster falloff and a darker background. If the face becomes too contrasty, use a white surface near the shadow side. Keep it subtle. Too much fill removes the mood.
Practical lights should support the composition, not compete with the subject. Dim a visible lamp or move it deeper into the frame. Its brightness often looks stronger on camera than in person. I sometimes leave one practical slightly imperfect, with a small exposure shift across the room. It can feel more lived-in. My first setup is rarely right. I check the background, then the eyes, and finally the shadow edges. A test recording exposes problems that a monitor preview can hide. Keep the light off the background when separation matters most.
Control background separation, shadows, and practical lights through distance and exposure falloff.
This reference setup normalizes the key light to 1,000 lux at 1 meter. Using the inverse-square law, illuminance falls as distance increases: a subject at 1.5 meters receives about 1.17 stops less light, while a background at 3 meters receives about 3.17 stops less. This creates separation without adding a second key. Keep the unfilled side of the face in shadow, and use practical lights only as controlled visual accents so they do not compete with the subject.
How to Achieve a Cinematic Look With One Light
Refine Color, Exposure, and Composition for a Filmic Image
A cinematic image begins with controlled contrast, not expensive equipment. Place one soft light slightly above eye level and angle it across the subject’s face. This creates a gradual shadow on the far cheek. Watch the background carefully. A small change in distance can separate the subject from a dull wall.
Expose for the brightest skin area, then check the shadow detail. Keep highlights from turning white, especially on the forehead or nose. A slightly darker exposure often feels more atmospheric. However, do not crush every shadow. Viewers still need to read the eyes, clothing, and nearby textures. I usually adjust the light before changing the camera settings. That habit preserves a more natural result.
Color should support the emotional temperature of the scene. Keep skin tones neutral, then introduce a restrained coolness into the background. A warm practical lamp or wooden surface can add visual contrast without overwhelming the frame. Composition matters just as much. Leave intentional space in the direction of the subject’s gaze, and remove bright distractions near the edges.
Not every frame will work.
Sometimes the shadows become too heavy, or the color shift feels artificial. That failure is useful. Review the image at full size, compare it with the real scene, and decide what the light is actually communicating. Filmic style is less about perfection than disciplined choices.
A small, hard source creates sharp shadows and bright highlights. It feels tense and theatrical. A larger source creates softer facial transitions.
Place it slightly above eye level and about 45 degrees from the subject. This preserves cheekbone shape. Keep the eyes visible.
A diffuser softens skin and reduces distracting texture. A grid narrows the beam and keeps the background darker. Use less than you expect.
Side lighting adds depth across the face. Backlighting separates the subject from a dull wall. Small angle changes can reshape the mood.
Place the subject several feet away from the background. This creates darker negative space. Keep the key light from spilling onto the wall.
Watch the shadow under the nose and along the cheek. Use a white surface near the shadow side for gentle detail. Too much fill removes the mood.
Dim a visible lamp or move it deeper into the frame. Its brightness may appear stronger on camera. A slightly uneven glow can feel lived-in.
Check exposure with a grey card. Then inspect the brightest facial area, eyes, background, and shadow edges. My first setup is rarely right. Test recording reveals hidden problems.
Creating a cinematic image with one light is less about expensive equipment and more about deliberate control. How to achieve a cinematic look with a single light source begins with understanding how direction, softness, and contrast shape mood. Choose a suitable light and modifier, then place it at an angle that creates dimensional modeling on the subject. Adjust its height and distance to control shadow depth, falloff, and facial definition, while using nearby surfaces or simple flags to manage unwanted spill.
A filmic result also depends on the relationship between the subject and the background. Position the subject to create separation, preserve purposeful shadows, and incorporate practical lights only when they support the scene’s atmosphere. Refine the image through balanced exposure, restrained color choices, and thoughtful composition. By combining controlled contrast, motivated lighting, and visual simplicity, a single light can produce an expressive, polished, and cinematic frame.

Gravity Light